Customizing the ribbon
The project administrator can customize the ribbon interface of CADMATIC applications. Using XML code, it is possible to add new tabs, new tool groups, and new command buttons, with or without drop-down menus, to the ribbon.
The XML code can be defined in a single file or split into separate files. For example, you may want each application or each tab to have its own XML file. When the application starts, it reads the available XML codes and adds the customizations to the ribbon. When the user selects a custom command from the ribbon or presses the associated hotkey, the application performs a script function or runs a separate script file, as defined in the XML code. Typically, ribbon customization is used to run scripts that perform special operations for which there is no default command in the ribbon.
Hotkeys assigned through customization work globally from any tab in the given ribbon. If the target command already has a hotkey, the new hotkey overrides the existing hotkey. Note that you cannot customize the Access keys that appear on top of the ribbon after pressing the Alt key.
In this topic, we use Plant Modeller as the example application and show some ways in which its ribbon can be customized.
The XML format
The XML format used in ribbon customization specifies where and how custom commands should appear:
-
In P&ID, Plant Modeller, or the Plant Modeller document editor.
-
In a default tab or a new tab.
-
In the default custom tool group (named Custom) or a new tool group.
-
As a button displaying the default script action icon
 or a custom icon.
 -
As a drop-down menu item displaying a custom icon or no icon.
-
Showing the same icon or different icons in light and dark mode.
Tip: A single image with transparent background may work well in both light and dark mode.
Examples
-
This example XML definition adds a custom command with a hotkey to a default tab:
Copy<RibbonSettings>
<Ribbon Name="main">
<RibbonTab Name="structuralTab">
<CustomCommand Name="My Route Wall" CommandData="C:\MyCustomScripts\MyRouteWallTool.mac main()" Hotkey="Shift+R" Image="C:\MyCustomScripts\MyRouteWall.ico" />
</RibbonTab>
</Ribbon>
</RibbonSettings> -
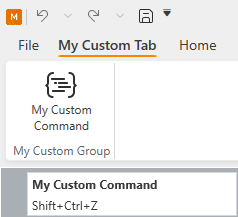
This example XML definition adds a custom tab with a custom tool group including a custom command, and assigns a hotkey to a default ribbon command identified by its command ID:
Copy<RibbonSettings>
<Ribbon Name="main">
<RibbonTab Name="myCustomTab1" Text="My Custom Tab" Index="0">
<TabGroup Name="myCustomGroup1" Text="My Custom Group">
<CustomCommand Name="My Custom Command" CommandData="C:\MyScript.mac main()" Hotkey="Shift+R" />
</TabGroup>
</RibbonTab>
<CustomHotkey Target="12100" Hotkey="F2" />
</Ribbon>
</RibbonSettings>
Software upgrades
The XML format does not change between software releases so there is no need to update the XML when upgrading the software to a newer version. However, changes in the scripting interface may require modifying the scripts that the XML code executes.
Reserved characters
The XML format does not allow reserved XML characters within value fields. Use the respective named entities instead.
|
Reserved character |
Named entity |
|---|---|
|
" |
" |
|
& |
& |
|
' |
' |
|
< |
< |
|
> |
> |
You can customize the ribbon using the following XML elements.
Ribbon | RibbonTab | TabGroup | CustomCommand | CustomHotkey | CustomDropDown | CustomSeparator
Ribbon
The <Ribbon> element defines the target ribbon.
This XML element has a single attribute.
|
Attribute name |
Attribute value |
Comments |
|---|---|---|
|
Name |
ribbon identifier |
The internal name of the ribbon to modify.
|
Ribbon elements can contain:
-
RibbonTab elements that specify whether to customize an existing tab or create a new one.
-
CustomHotkey elements that add a custom hotkey to an existing command.
RibbonTab
The <RibbonTab> element defines the target tab.
If the tab does not exist, a new tab is created in the specified ribbon.
This XML element can have the following attributes.
|
Attribute name |
Attribute value |
Comments |
|---|---|---|
|
Name |
tab identifier |
The internal name of the tab. The value of this attribute specifies whether the customization will create a new tab or modify a default tab. To create a new tab, the attribute value must be a unique name not used by any other tab in the target application, such as 'myCustomTab1'. To modify an existing tab, the attribute value must be one of the following.
Important: On the Drafting and Import tabs of the document editor, custom commands are run as DW scripts so that they can modify 2D annotations via DW script externs, using the currently selected page or view and annotation property defaults. On other tabs they are run as Plant Modeller scripts. |
|
Text |
tab name |
(Optional) The tab name to show in the ribbon. This name can include spaces. If not specified, the value of the Name attribute is shown. |
|
Index |
tab index |
(Optional) The ordinal number of the tab within the ribbon, counting from zero. If the value is invalid or not specified, the tab is added to the end. |
RibbonTab elements can contain:
-
TabGroup elements that add a group to specified tab.
-
CustomCommand elements that add a command button to the specified tab.
-
CustomDropDown elements that add a command button with a drop-down menu to the specified tab.
Example
Example 1 – Adding a custom command to an existing tab
TabGroup
The <TabGroup> element defines the tool group to which to add the command.
If the tool group does not exist, a new group is created in the specified tab.
If not specified, the command is added to the default custom tool group named Custom.
This XML element can have the following attributes.
|
Attribute name |
Attribute value |
Comments |
|---|---|---|
|
Name |
group identifier |
The internal name of the group, such as 'myCustomGroup1'. If a group by the given name already exists, Text and Index are ignored. |
|
Text |
group name |
(Optional) The group name to show in the ribbon. This name can include spaces. If not specified, the value of the Name attribute is shown. |
|
Index |
group index |
(Optional) The ordinal number of the group within the tab, counting from zero. If the value is invalid or not specified, the group is added to the end. |
Example
Example 3 – Adding a custom tab with custom groups
CustomCommand
The <CustomCommand> element defines the command to add to the ribbon.
The actual command is implemented as a script whose location is defined in an attribute.
This XML element can have the following attributes.
|
Attribute name |
Attribute value |
Comments |
|---|---|---|
|
Name |
command name |
The command name to show in the ribbon. |
|
CommandData |
path to script file function interface to call |
The path to the script file to run. If the command is to run a specific function in that file, the function call comes after the path, separated by a single space character. CommandData="C:\MyScript.mac main()" Note that certain characters are reserved and normally cannot be used as part of the attribute value, as described in Reserved Characters in XML. If you must use double quotes (") within CommandData, use single quotes (') around the attribute value, as shown below. CommandData='macro/ChangeObjPid.mac ChangeDMPartId("AIRDUCT")' |
|
Index |
button index |
(Optional) The ordinal number of the button within the group, counting from zero. If the value is invalid or not specified, the button is added to the end. |
|
Hotkey |
modifier key(s) + key |
(Optional) A single key or a key combination for running the command from the keyboard, regardless of which tab is currently active. The possible modifier keys are Shift, Ctrl, and Alt. The separator character in key combinations is + and there must be no spaces around it: "Shift+A" For information on how to refer to various keys on the keyboard, see the 'Key Enums' list at docs.microsoft.com. For example, if you want the hotkey to use the 1 (one) key, "D1" is the normal 1 key and "NumPad1" is the 1 key on the numeric keypad. |
|
Image |
path to the image file in light mode |
(Optional) The icon to display in the command button (or drop-down menu item) when the user interface is in light mode. Supported formats: ICO, PNG, JPG, GIF, BMP If not defined, the default script icon is shown |
|
DarkModeImage |
path to the image file in dark mode |
(Optional) The icon to display in the command button (or drop-down menu item) when the user interface is in dark mode. Supported formats: ICO, PNG, JPG, GIF, BMP If not defined, the light mode image is shown, except when the command appears in a drop-down menu, in which case no icon is shown. |
Example
Example 1 – Adding a custom command to an existing tab
CustomHotkey
The <CustomHotkey> element defines a single key or a key combination for running an existing ribbon command from the keyboard, regardless of which tab is currently active.
If the command already has a hotkey, the new hotkey overrides the existing hotkey. However, you cannot override hotkeys used in 3D digitizing and navigation.
If the same hotkey is assigned to multiple commands, only one of them will use the hotkey.
Important: The <CustomHotkey> element must be inside the <Ribbon> element. If you put it inside the <RibbonTab> element, the hotkey will not work.
This XML element can have the following attributes.
|
Attribute name |
Attribute value |
Comments |
|---|---|---|
|
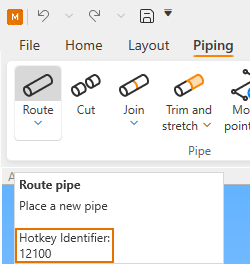
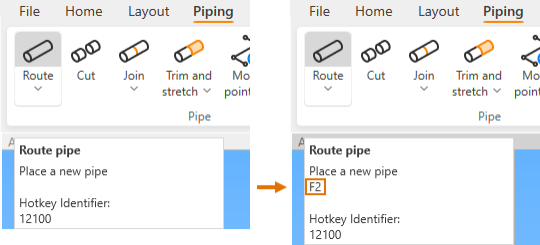
Target |
identifier of target command |
A number or text string that identifies the target command, such as "12100" which runs the Route > Route pipe command or "Follow_Pipe" which runs the Route > Follow pipe command. Most commands in the ribbon have hotkey identifiers and you can see their values in the tooltip text of the command. If the identifiers are not shown, go to File > Settings > User Settings > User Interface and select the Show command ids for custom hotkeys in tooltips option, as described in Ribbon tooltips.
|
|
Hotkey |
modifier key(s) + key |
A single key or a key combination for running the command from the keyboard, regardless of which tab is currently active. The possible modifier keys are Shift, Ctrl, and Alt. The separator character in key combinations is + and there must be no spaces around it: "Shift+A" For information on how to refer to various keys on the keyboard, see the 'Key Enums' list at docs.microsoft.com. For example, if you want the hotkey to use the 1 (one) key, "D1" is the normal 1 key and "NumPad1" is the 1 key on the numeric keypad. |
Example
This example code adds hotkeys for various commands in different tabs.
<RibbonSettings>
<Ribbon Name="main">
<!-- Piping > Route Pipe -->
<CustomHotkey Target="12100" Hotkey="F2" />
<!-- Piping > Insert default flanges -->
<CustomHotkey Target="12300" Hotkey="F3" />
<!-- Piping > Insert Standard Component -->
<CustomHotkey Target="12500" Hotkey="F4" />
<!-- Ducting > Route Air Duct -->
<CustomHotkey Target="16100" Hotkey="Shift+F2" />
<!-- Ducting > Insert flange set -->
<CustomHotkey Target="16101" Hotkey="Shift+F3" />
<!-- Ducting > Insert part into straight duct -->
<CustomHotkey Target="16500" Hotkey="Shift+F4" />
<!-- Cable Tray > Route Cable Tray -->
<CustomHotkey Target="16900" Hotkey="Alt+F2" />
<!-- Home > Delete a set of objects -->
<CustomHotkey Target="18500" Hotkey="F9" />
</Ribbon>
</RibbonSettings>For example, it assigns the F2 key to the Piping > Route pipe command.
CustomDropDown
The <CustomDropDown> element adds a command button with a drop-down menu to the ribbon.
The command button can be set to run a command or open the drop-down menu.
This XML element can have the following attributes.
|
Attribute name |
Attribute value |
Comments |
|---|---|---|
|
Name |
command name |
The command name to show in the ribbon. |
|
CommandData |
path to script file function interface to call |
(Optional) Specifies how the button functions when the user clicks the button:
The path to the script file to run. If the command is to run a specific function in that file, the function call comes after the path, separated by a single space character. CommandData="C:\MyScript.mac main()" Note that certain characters are reserved and normally cannot be used as part of the attribute value, as described in Reserved Characters in XML. If you must use double quotes (") within CommandData, use single quotes (') around the attribute value, as shown below. CommandData='macro/ChangeObjPid.mac ChangeDMPartId("AIRDUCT")' |
|
Index |
button index |
(Optional) The ordinal number of the button within the group, counting from zero. If the value is invalid or not specified, the button is added to the end. |
|
Hotkey |
modifier key(s) + key |
(Optional) A single key or a key combination for running the command from the keyboard, regardless of which tab is currently active. The possible modifier keys are Shift, Ctrl, and Alt. The separator character in key combinations is + and there must be no spaces around it: "Shift+A" For information on how to refer to various keys on the keyboard, see the 'Key Enums' list at docs.microsoft.com. For example, if you want the hotkey to use the 1 (one) key, "D1" is the normal 1 key and "NumPad1" is the 1 key on the numeric keypad. |
|
Image |
image path |
(Optional) The icon to display in the command button. Supported formats: ICO, PNG, JPG, GIF, BMP If not defined, the default script icon is shown. |
CustomDropDown elements can contain:
-
CustomCommand elements that add a command to the drop-down menu.
-
CustomSeparator elements that add a separator line between two drop-down menu items.
Example
Example 2 – Adding custom commands to a drop-down menu
CustomSeparator
The <CustomSeparator> element adds a horizontal separator line to the drop-down menu.
This XML element has no attributes.
Example
<CustomSeparator />
XML code examples
A default software installation includes a script source file for testing Plant Modeller ribbon customizations:
-
%PMS_HOME%\pm\macro\Examples\MyRouteWallTool.mac
Open the file in a text editor and read the implementation instructions included in the file. The file contains the code examples shown below and the actual script code that is run when you test the example commands from the ribbon.
Example 1 – Adding a custom command to an existing tab
This code example adds a custom command named My Route Wall in the Structural tab. Since the tool group is not specified, the command button appears in a default group named Custom.

<RibbonSettings>
  <Ribbon Name="main">
    <RibbonTab Name="structuralTab">
      <CustomCommand Name="My Route Wall" CommandData="C:\MyCustomScripts\MyRouteWallTool.mac main()" Hotkey="Shift+R" Image="C:\MyCustomScripts\MyRouteWall.ico" />
    </RibbonTab>
  </Ribbon>
</RibbonSettings>When the user clicks the command button or uses the Shift+R hotkey, the application compiles the C:\MyCustomScripts\MyRouteWallTool.mac script and runs the entry function 'main'. An alternative approach would be to precompile the *.mac file to a binary script file (*.bs) and define the command like this:
CommandData="C:\MyCustomScripts\MyRouteWallTool.bs main()"
If the function call contains double quotes (") you can put the CommandData definition inside single quotes ('), and vice versa, or you can replace double quotes with " in the XML. For more information, see Reserved Characters in XML.
Example 2 – Adding custom commands to a drop-down menu
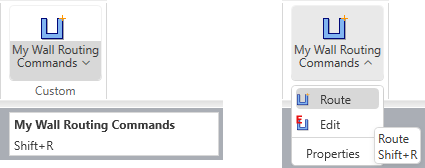
This code example adds a custom button named My Wall Routing Commands in the Structural tab. Clicking the command button runs the Route command, and the drop-down menu includes the commands Route, Edit, and Properties. A separator line is inserted before the last menu item.
<RibbonSettings>
  <Ribbon Name="main">
    <RibbonTab Name="structuralTab">
      <CustomDropDown Name="My Wall Routing Commands" CommandData="C:\MyCustomScripts\MyRouteWallTool.mac main()" Hotkey="Shift+R" Image="C:\MyCustomScripts\MyRouteWall.ico" >
        <CustomCommand Name="Route" CommandData="C:\MyCustomScripts\MyRouteWallTool.mac main()" Hotkey="Shift+R" Image="C:\MyCustomScripts\MyRouteWall.ico" />
        <CustomCommand Name="Edit" CommandData="C:\MyCustomScripts\MyRouteWallTool.mac edit_it()" Hotkey="Alt+R" Image="C:\MyCustomScripts\MyEditWall.ico" />
        <CustomSeparator />
        <CustomCommand Name="Properties" CommandData="C:\MyCustomScripts\MyRouteWallTool.mac show_properties()" Hotkey="Ctrl+R" />
      </CustomDropDown>
    </RibbonTab>
  </Ribbon>
</RibbonSettings>
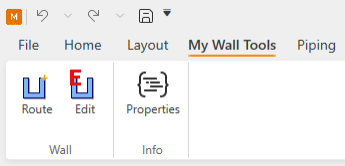
Example 3 – Adding a custom tab with custom groups
This code example adds a custom tab named My Wall Tools in the third tab position (Index = 2). This tab includes two custom tool groups: Wall that includes the Route and Edit commands, and Info that includes the Properties command.
<RibbonSettings>
  <Ribbon Name="main">
    <RibbonTab Name="mywalltoolsTab" Text="My Wall Tools" Index="2">
      <TabGroup Name="Mywalltools" Text="Wall">
        <CustomCommand Name="Route" CommandData="C:\MyCustomScripts\MyRouteWallTool.mac main()" Hotkey="Shift+R" Image="C:\MyCustomScripts\MyRouteWall.ico" />
        <CustomCommand Name="Edit" CommandData="C:\MyCustomScripts\MyRouteWallTool.mac edit_it()" Hotkey="Alt+R" Image="C:\MyCustomScripts\MyEditWall.ico" />
      </TabGroup>
      <TabGroup Name="Mywallinfo" Text="Info">
        <CustomCommand Name="Properties" CommandData="C:\MyCustomScripts\MyRouteWallTool.mac show_properties()" Hotkey="Ctrl+R" />
      </TabGroup>
    </RibbonTab>
  </Ribbon>
</RibbonSettings>
Example 4 – Adding a custom group to an existing tab
This code example adds a custom tool group named Wall in the second position (Index = 1) in the Structural tab, with three commands: Route, Edit, and Properties.
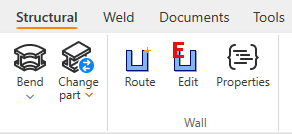
<RibbonSettings>
  <Ribbon Name="main">
    <RibbonTab Name="structuralTab">
      <TabGroup Name="Mywalltools" Text="Wall" Index="1">
        <CustomCommand Name="Route" CommandData="C:\MyCustomScripts\MyRouteWallTool.mac main()" Hotkey="Shift+R" Image="C:\MyCustomScripts\MyRouteWall.ico" />
        <CustomCommand Name="Edit" CommandData="C:\MyCustomScripts\MyRouteWallTool.mac edit_it()" Hotkey="Alt+R" Image="C:\MyCustomScripts\MyEditWall.ico" />
        <CustomCommand Name="Properties" CommandData="C:\MyCustomScripts\MyRouteWallTool.mac show_properties()" Hotkey="Ctrl+R" />
      </TabGroup>
    </RibbonTab>
  </Ribbon>
</RibbonSettings>
Choosing a location for the XML
There are several locations where the XML code that customizes the ribbon interface of the application can be stored. Choose a location that fits your needs—the XML schema is always the same, wherever you store the code. For initial development and testing, Option 3 – Site Directory is the safest option. For long-term storage, Option 1 – COS Library Database makes it easy to enable or disable customizations in different projects as needed.
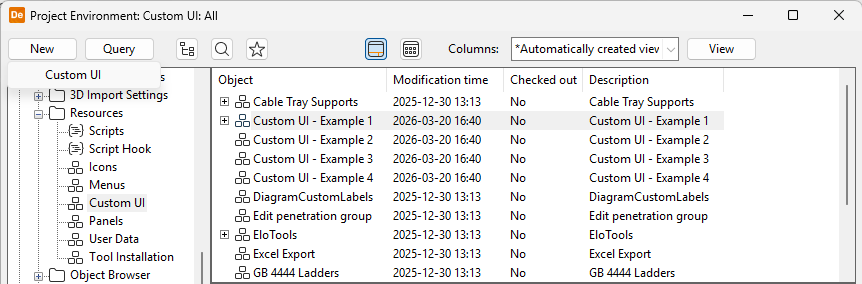
Option 1 – COS Library Database
You can store the XML content in a COS object of type 'Custom UI' in the library database.
Select this option if all the users in any of your projects, on all replica sites, should use the customization.
You must approve the customization for use in the projects.
Starting the application copies the customization to the following directory:
-
%PMS_PROJROOT%/%PMS_PROJNAME%/Site/common/custom_ui
Option 2 – COS Project Database
You can store the XML content in a COS object of type 'Custom UI' in the project database.
Select this option if all the users in the given project, on all its replica sites, should use the customization.
Starting the application copies the customization to the following directory:
-
%PMS_PROJROOT%/%PMS_PROJNAME%/Site/common/custom_ui.
You can store the XML content in a file that you save in the following directory:
-
%PMS_PROJROOT%/%PMS_PROJNAME%/Site/local/custom_ui/
Select this option if all the users on this site of the project should use the customization.
You can also use this option to test a customization locally before you store it in COS.
Option 4 – Installation Directory
You can store the XML content in a file named ui.xml that you save in the following directory (or in one of its subdirectories):
-
%PMS_HOME%\custom\
Important: Although this option has been used in the past for CADMATIC customer implementations, we no longer recommend it because every version upgrade—even a minor version upgrade—deletes the directory structure and restores its default contents, possibly causing customization files to be lost.
Creating a new customization
In this example procedure, we create a new ribbon customization in the library database.
Note: It is recommended to test new customizations in a private environment before storing them in COS, as described in Choosing a location for the XML.
Prerequisites
-
You are familiar with The XML format.
Do the following:
-
In the CADMATIC desktop, select Object > Library and Project Databases. The Project Environment dialog opens.
-
Browse to [library] > Resources > Custom UI, and select New > Custom UI.
-
In the Edit Object Attributes dialog, enter a descriptive name (description) for the 'Custom UI' object, and click OK.
-
In the Project Environment dialog, right-click the new 'Custom UI' object, and select Edit. The default text editor opens.
-
Enter the required XML code in the text editor, and save and check in the file.
-
Start the target application and check that your customization works as intended.
-
When ready to distribute the customization, approve the 'Custom UI' object for use in the project.